We’re going to explore how to write MicroData for a CreativeWork on a fake website so we can look at the important concepts and how to implement them.
All these techniques will later be applied to your portfolio website.
Look at writing the code necessary for describing portfolio piece using MicroData and Schema.org.
We’re going to explore how to write MicroData for a CreativeWork on a fake website so we can look at the important concepts and how to implement them.
All these techniques will later be applied to your portfolio website.
Start the lesson by forking and cloning the portfolio-metadata repository.
Fork & clone the “portfolio-metadata” repo.
The repository will have some starter files to get you on your way and include requirements for Markbot so you can be sure you’ve completed the lesson.
This includes some starter code that you can get by forking and cloning the repository. You’ll use Markbot to double check everything is done properly.
We’re going to write the HTML necessary for marking up a WebSite portfolio piece using Schema.org.
index.html fileindex.html with the boilerplate codeRemember the purpose of this lesson is to type the code out yourself—build up that muscle memory in your fingers!
Don’t forget to follow the naming conventions.
Create the boilerplate with html5, viewport
Before we start adding the metadata, let’s add the basic HTML markup for a portfolio piece. Copy the text from content.txt to save some time.
For this we’re concentrating on a WebSite—if it was a visual artwork or a photograph there would be other specific properties.
You may also want to check out the generic CreativeWork that can be applied to non-specific portfolio pieces.
⋮
<body>

  <figure>
    <img src="https://placehold.it/1600x900" alt="">
    <figcaption>
      <h2>Dinos ’R’ Us</h2>
      <p>A shop-at-home website dedicated to the many amazing dinosaur products.</p>
      <p>The goal of the project was create a pattern library for a large-scale website and show pattern examples on a few sample pages.</p>
      <p><em>Won the RGD Student Award 2015</em></p>
      <a href="https://thomasjbradley.ca/work/dinos-r-us/">View website</a>
      <aside>Web, Responsive, CSS, Mobile, Dinosaurs</aside>
    </figcaption>
  </figure>

</body>
</html>
This is an example of a really basic portfolio piece you might see on your website.
It intentionally doesn’t include case-study related information to simplify the code in this lesson.
We’re now going to add JSON-LD to the website to help search engines understand the content and display better results.
All of the properties we’re adding are documented under the WebSite type on Schema.org.
⋮
    </figcaption>
  </figure>

  <script type="application/ld+json">
    {
      "@context": "https://schema.org",
      "@type": "WebSite",
      "name": "Dinos ’R’ Us",
      "description": "A shop-at-home website dedicated to the many amazing dinosaur products.",
      "image": "https://placehold.it/1600x900",
      "award": "Won the RGD Student Award 2015",
      "url": "https://thomasjbradley.ca/work/dinos-r-us/",
      "keywords": "Web, Responsive, CSS, Mobile, Dinosaurs"
    }
  </script>

</body>
</html>
All the above properties are fairly self-explanatory—but only the most basic ones. Check out the Schema.org WebSite type for all the possibilities.
Don’t forget to add the <script> tag.
The major thing missing from the above metadata is the author of this creative work—the person who designed it.
Most likely we’ll have all the necessary author information in the <footer> of the website. But we want to link the same information into the JSON-LD.
⋮
    </figcaption>
  </figure>

  <footer role="contentinfo">
    <p>© Thomas J Bradley</p>
    <a href="mailto:hey@thomasjbradley.ca">hey@thomasjbradley.ca</a>
    <address>
      Ottawa, Ontario
      <br>Canada
    </address>
  </footer>

  <script type="application/ld+json">
    {
⋮
Now we can write another chunk of JSON-LD linking the author with the creative work.
⋮
    </address>
  </footer>

  <script type="application/ld+json">
    {
      "@context": "https://schema.org",
      "@type": "WebSite",
      "name": "Dinos ’R’ Us",
      "author": {
        "@type": "Person",
        "@id": "#thomasjbradley"
      },
      "description": "A shop-at-home website dedicated to the many amazing dinosaur products.",
      "image": "https://placehold.it/1600x900",
      "award": "Won the RGD Student Award 2015",
      "url": "https://thomasjbradley.ca/work/dinos-r-us/",
      "keywords": "Web, Responsive, CSS, Mobile, Dinosaurs",
    }
  </script>

  <script type="application/ld+json">
    {
      "@context": "https://schema.org",
      "@type": "Person",
      "@id": "#thomasjbradley",
      "name": "Thomas J Bradley",
      "email": "hey@thomasjbradley.ca",
      "url": "https://thomasjbradley.ca"
    }
  </script>

</body>
</html>
Add a new blocked named author, it doesn’t have any specific information, it just links to another JSON-LD block.
The new “author” JSON-LD block. Notice the schema-type is Person.
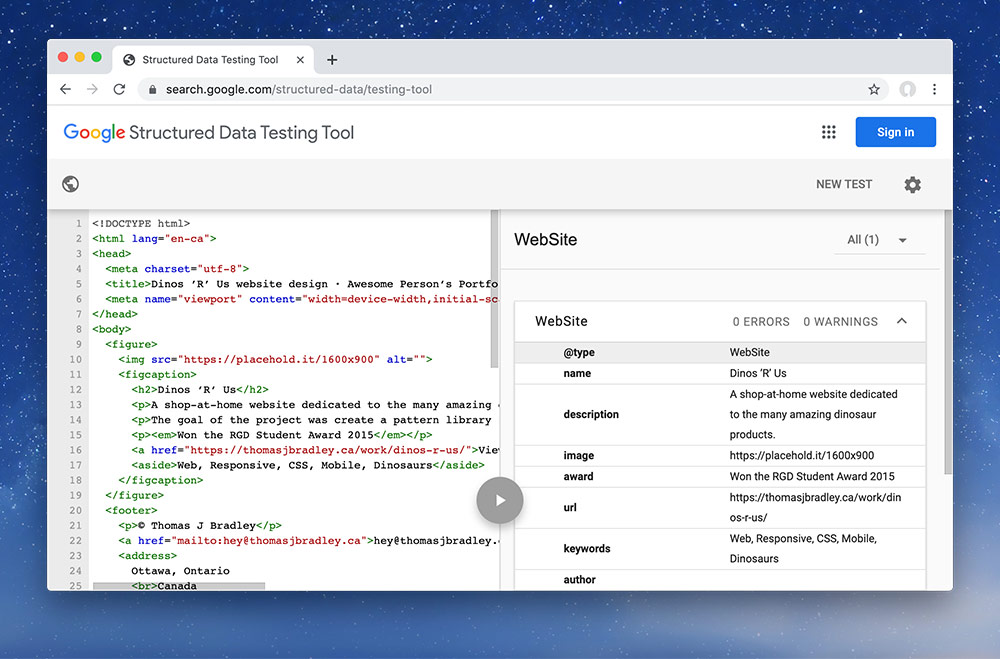
Before getting this checked by the teacher it’s a good idea to validate it. Google’s Rich Snippets Testing Tool allows you to paste the metadata enhanced HTML and it will extract the information out of it. If the tool finds any errors they’ll be displayed on the side.

Copy and paste your HTML into the “Code Snippet” box and make sure there are no red errors.
It should look like this if everything is okay:
Using Jekyll & pattern libraries we can very easily generate the JSON-LD information for every portfolio piece at the same time we generate the pages themselves.
Drop the final, coded exercise into Markbot and fix all the errors until Markbot gives you all green (and maybe a little yellow).
After you’ve fixed all the problems, go ahead and submit the assignment. You’ll immediately get your grade.