Mulit-file patterns

Create a pattern that has lots of different styles and required code using multiple HTML files.

Goal

We already have our pattern library set up so now we’re ready to make a new multi-file pattern.

Some patterns might have different variations of the basic core idea: like different versions of cards as an example. They’re still thematically the same pattern but would benefit from being inside different HTML files.

  1. Type it, type it real good

    Remember the purpose of this lesson is to type the code out yourself—build up that muscle memory in your fingers!

1 Set up project

We’ll set up our two cards for the website, one card in each file, but they will still share the same CSS.

Let’s create a few new folders & code files:

  1. ecommerce-pattern-library
  2. README.md
  3. common
  4. images
  5. patterns
  6. cards
  7. cards.css
  8. basic-card.html
  9. icon-card.html
  10. README.md
  1. Inside the patterns folder make a new folder named cards
  2. Inside the cards folder make the following empty files:
    • cards.css
    • basic-card.html
    • icon-card.html
    • README.md
  1. Naming conventions

    Don’t forget to follow the naming conventions.

2 Make some HTML

Let’s write a little tiny bit of HTML just to get things started.

Remember this is all fake—you should be filling in your own information, your own styles, everything.

<!DOCTYPE html>
<html lang="en-ca">
<head>
  <meta charset="utf-8">
  <title>Basic card</title>
  <meta name="viewport" content="width=device-width,initial-scale=1">
  <link href="../../common/modules.css" rel="stylesheet">
  <link href="../../common/grid.css" rel="stylesheet">
  <link href="../../common/type.css" rel="stylesheet">
  <link href="../../common/theme.css" rel="stylesheet">
  <link href="https://fonts.googleapis.com/css?family=Overpass:400,400i,700" rel="stylesheet">
  <link href="cards.css" rel="stylesheet">
</head>
<body>

  <div class="card island-1-2">
    <h2 class="push-1-4">This is a card</h2>
    <p class="push-0">Lorem ipsum dolor sit amet, consectetuer adipiscing elit.</p>
  </div>

</body>
</html>

If you don’t plan on using an “icon card” then make something else up that’s appropriate for your website.

<!DOCTYPE html>
<html lang="en-ca">
<head>
  <meta charset="utf-8">
  <title>Icon card</title>
  <meta name="viewport" content="width=device-width,initial-scale=1">
  <link href="../../common/modules.css" rel="stylesheet">
  <link href="../../common/grid.css" rel="stylesheet">
  <link href="../../common/type.css" rel="stylesheet">
  <link href="../../common/theme.css" rel="stylesheet">
  <link href="https://fonts.googleapis.com/css?family=Overpass:400,400i,700" rel="stylesheet">
  <link href="cards.css" rel="stylesheet">
</head>
<body>

  <div class="card island-1-2 text-center">
    <i class="icon i-128 push-1-2">
      <svg><use xlink:href="../../images/icons.svg#velociraptor"></use></svg>
    </i>
    <h2 class="push-1-4">This is a card</h2>
    <p class="push-0">Lorem ipsum dolor sit amet, consectetuer adipiscing elit.</p>
  </div>

</body>
</html>

You probably want to drop these two into the browser individually to make sure they work.

Remember that icons need a web server (localhost) to function.

  1. Don’t just copy

    These are just simple examples, you’ll be setting up your own cards this week—likely completely replacing what we’ve done here.

3 Write some CSS

Next up we’ll write some CSS. When making multiple similar patterns I always like to keep the CSS together, that’s why there is only cards.css and not basic-card.css & icon-card.css

.card {
  border: 4px solid var(--color-primary-light);
  border-radius: 8px;
}

Give your browser a refresh to make sure that works properly.

  1. Don’t just copy

    These are just simple examples, you’ll be setting up your own cards this week—likely completely replacing what we’ve done here.

4 Write the README

When we previously did the “Buttons” pattern our readme was really basic, there was only some Markdown and no YAML.

The readme for a mulit-HTML-file pattern requires some YAML so we can individually describe each separate sub-pattern.

---
basic-card: |
  The basic card should only be for information, it could include a button, but is never a link itself.
icon-card: |
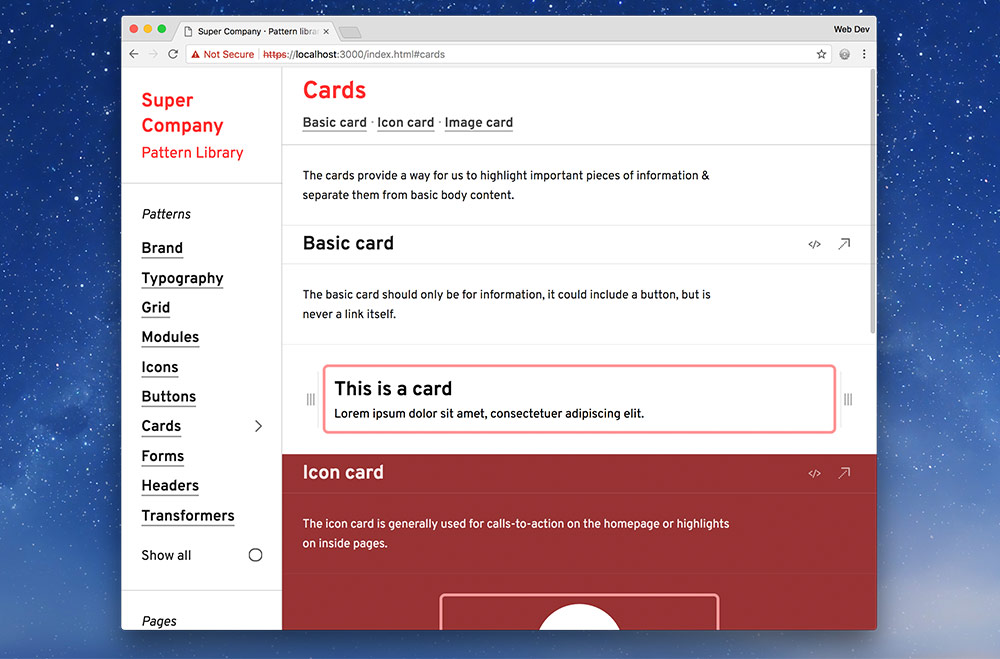
  The icon card is generally used for calls-to-action on the homepage or highlights on inside pages.
---

The cards provide a way for us to highlight important pieces of information & separate them from basic body content.
  1. Don’t just copy

    These are just simple examples, you’ll be setting up your own cards this week—likely completely replacing what we’ve done here.

  2. Line B

    The name of the YAML entry is exactly the same as the HTML file, minus the .html extension.

  3. Line H

    The description that comes after all the YAML will label the whole “Cards” section in the pattern library. While each individual YAML entry will describe each sub-pattern.

5 Generate with Patternbot

Now that we have super basic cards set up let’s drop our folder into Patternbot and generate the whole pattern library.

You should see “Cards” in the navigation and the sub-nav should have both the “Basic card” and the “Icon card”.

Notice how the background colour of the “Icon card” is different—we can configure each different pattern separately to help them fit your brand. Ask the teacher for different options.

Drop it into Markbot

Drop the final, coded exercise into Markbot and fix all the errors until Markbot gives you all green (and maybe a little yellow).

Be sure to keep the green check open to show the teacher!

  1. Can’t submit

    Markbot won’t let you submit this exercise because it’s getting checked by the teacher during class.