Contact form

Create a functional website contact form using Formspree as the message sender.

Goal

We’re going to look at how to make a functional contact form. With only HTML, and no backend server, it would be impossible to actually send messages—but there are some services that’ll help us out. We’ll use Formspree to help make our contact form messages send.

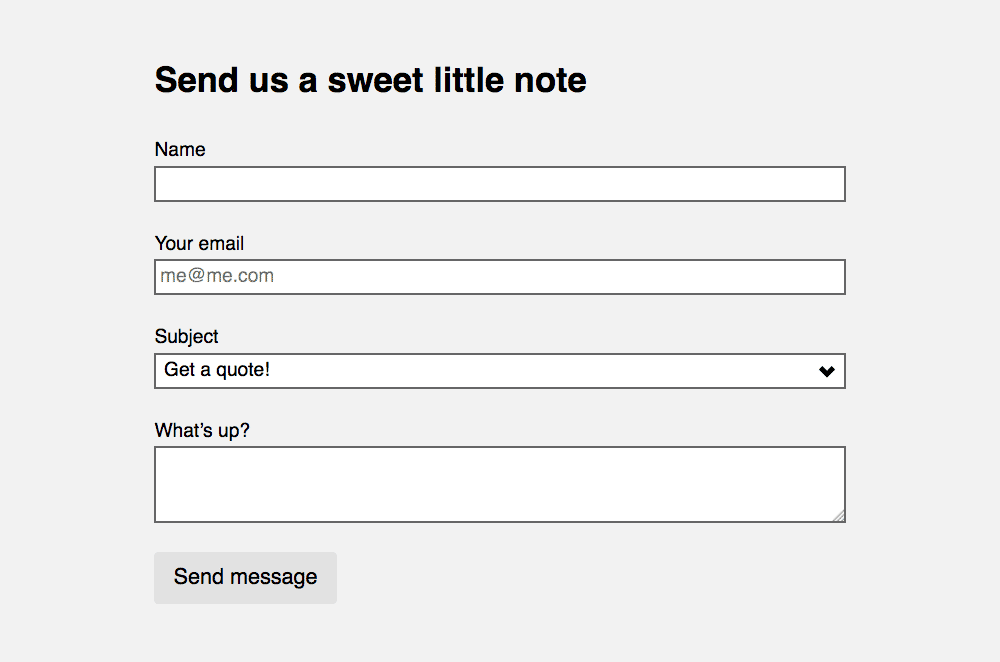
This is what it should look like when it’s done:

  1. Type it, type it real good

    Remember the purpose of this lesson is to type the code out yourself—build up that muscle memory in your fingers!

Fork & clone

Start the lesson by forking and cloning the contact-form repository.

Fork & clone the “contact-form” repo.

The repository will have some starter files to get you on your way and include requirements for Markbot so you can be sure you’ve completed the lesson.

  1. Fork, clone & Markbot

    This includes some starter code that you can get by forking and cloning the repository. You’ll use Markbot to double check everything is done properly.

1 Project setup

The form isn’t going to work at all without running on a web server—the quickest way to get the form onto a web server is to use GitHub.

  1. contact-form
  2. css
  3. main.css
  4. modules.css
  5. type.css
  6. index.html

This repo has the HTML boilerplate and all the CSS files hooked up. The main.css file has everything we’ll need for today.

2 Write the basic HTML

Before we hook the contact form into Formspree let’s write all the HTML inputs necessary to make the form.

⋮
</head>
<body>

  <section>
    <div>
      <h1>Send us a sweet little note</h1>

      <form>
        <div>
          <label for="name">Name</label>
          <input id="name" required>
        </div>
        <div>
          <label for="email">Your email</label>
          <input id="email" type="email" placeholder="me@me.com" required>
        </div>
        <div>
          <label for="subject">Subject</label>
          <select id="subject">
            <option>Get a quote!</option>
            <option>General question</option>
            <option>Just to talk</option>
          </select>
        </div>
        <div>
          <label for="details">What’s up?</label>
          <textarea id="details" required></textarea>
        </div>
        <div>
          <button type="submit">Send message</button>
        </div>
      </form>
    </div>
  </section>

</body>
</html>

After writing out that HTML, this is what we should see:

That’s pretty darn ugly…

  1. Important

    Notice that a few of the form fields have the required attribute—it’s best practice that at least one field in a form is required.

  2. Line I

    Every element related to the <form> must be wrapped by this tag.

  3. Line J

    I usually wrap a <div> around every <input> because it gives more layout control—especially when using the grid system.

  4. Lines K–L

    It’s extremely critical that the for="" attribute on the <label> matches the id="" attribute on the associated <input>

  5. Line P

    The placeholder="" attribute allows us to put an example into the <input> field.

    It should never be used to replace a <label>!

    Also notice the type="email" attribute—this helps the browser validate the allowed information in the field.

  6. Lines T–X

    We could use a regular <input> for the subject but I thought it’d be fun to have a few items to choose from.

    The <select> input will present the user with a menu of options to choose from.

  7. Line AB

    The <textarea> element is a multiline text field, people can press Return in the field to make new lines without submitting the form.

  8. Line AE

    A <button> tag is used to submit the form’s information. It cannot link to another page.

    Without the type="submit" attribute the button won’t actually submit the form—it’ll require JavaScript to be functional.

3 Add the Web Dev Tools

The default look of forms is pretty abysmal—Modulifier has some slightly nicer form defaults, so let’s add that code into your website.

  1. contact-form
  2. css
  3. main.css
  4. modules.css Get the code and paste it
  5. type.css Get the code and paste it
  6. index.html

The web dev tools CSS files need to be populated:

  • Go to Modulifier and copy the CSS into modules.cssmake sure to press “Select all”
  • Go to Typografier and copy the default CSS into type.css

We’re not using a grid for this lesson so it doesn’t need to be included.

With the Web Dev Tools in place, it looks better:

4 Add some basic styling

Now let’s add a few classes to the form elements to make it look nicer.

The main.css file already has a class, .contact, to set the background colour for the <section>

⋮
</head>
<body>

  <section class="contact pad-t-2 pad-b-2">
    <div class="max-length">
      <h1>Send us a sweet little note</h1>

      <form class="push-0">
        <div class="push">
          <label for="name">Name</label>
          <input id="name" required>
        </div>
        <div class="push">
          <label for="email">Your email</label>
          <input id="email" type="email" placeholder="me@me.com" required>
        </div>
        <div class="push">
          <label for="subject">Subject</label>
          <select id="subject">
            <option>Get a quote!</option>
            <option>General question</option>
            <option>Just to talk</option>
          </select>
        </div>
        <div class="push">
          <label for="details">What’s up?</label>
          <textarea id="details" required></textarea>
        </div>
        <div>
          <button class="btn btn-light mega" type="submit">Send message</button>
        </div>
      </form>
    </div>
  </section>

</body>
</html>

And now the form should look good—like this:

  1. Line E

    Add a few classes to make the <section> nicer: .contact (in main.css already) & .pad-t-2 and .pad-b-2 from type.css

  2. Line F

    Add the .max-length class so the form’s width doesn’t go crazy on us.

  3. Line I

    The <form> tag has some default margins that we’re going to remove.

  4. Line J

    If we add .push to all the <div> tags (except the last) we can space all the inputs out nicely.

  5. Line AE

    Add the .btn and .btn-light classes to the button to make it look better than the default styles.

    And make it a little larger with .mega

5 Hook the form to Formspree

Now that our form looks good we’re going to hook it into Formspree so that our messages actually send.

With HTML only, our forms don’t do anything. We can do some processing with JavaScript but without a backend server we can’t send emails. So Formspree is going to be our backend server.

⋮
</head>
<body>

  <section class="contact pad-t-2 pad-b-2">
    <div class="max-length">
      <h1>Send us a sweet little note</h1>

      <form class="push-0" method="POST" action="https://formspree.io/thomas@learntheweb.courses">
        <div class="push">
          <label for="name">Name</label>
          <input id="name" name="name" required>
        </div>
        <div class="push">
          <label for="email">Your email</label>
          <input id="email" type="email" placeholder="me@me.com" name="email" required>
        </div>
        <div class="push">
          <label for="subject">Subject</label>
          <select id="subject" name="_subject">
            <option>Get a quote!</option>
            <option>General question</option>
            <option>Just to talk</option>
          </select>
        </div>
        <div class="push">
          <label for="details">What’s up?</label>
          <textarea id="details" name="message" required></textarea>
        </div>
        <div>
          <button class="btn btn-light mega" type="submit">Send message</button>
        </div>
      </form>
    </div>
  </section>

</body>
</html>

Don’t forget to change the email address to your email address!

  1. Line I

    The <form> tag gets two new attributes—as shown in the Formspree documentation.

    • methodPOST, tells the browser how to send the information to the server.
    • action — The URL to the server the information should be sent—make sure to change it to your email address!
  2. Line L

    Every field in the form now gets a name="" attribute. It doesn’t really matter what the name is but a few of them are specialized:

    • name="email" — Formspree will use this as the email’s “Reply To” entry.
    • name="_subject" — Formspree will use this as the subject of the email message

    You can also provide the URL for a “Thank You” page—check out the Formspree documentation to see how to do that.

6 Commit, sync, test

Commit & sync the code to GitHub so we can test that it works.

If you try to submit on your local computer Formspree will give you an error message.

After the website is live, on GitHub, go to the github.io URL and submit your form!

7 Confirmation in your email

The first message you get from Formspree will be a confirmation one. You have to go to your email and confirm your email address! After that Formspree will just send the message to your email address.

Drop it into Markbot & submit

Drop the final, coded exercise into Markbot and fix all the errors until Markbot gives you all green (and maybe a little yellow).

After you’ve fixed all the problems, go ahead and submit the assignment. You’ll immediately get your grade.

  1. Submit

    Whenever you’ve passed all Markbot’s specific tests go ahead and submit this lesson for marks.