We’re going to look at how to use jQuery to change how we work with HTML in JavaScript.
This is what it should look like when it’s done:

Use jQuery to simplify manipulating HTML while building a list of dinosaurs in JavaScript.
We’re going to look at how to use jQuery to change how we work with HTML in JavaScript.
This is what it should look like when it’s done:
Remember the purpose of this lesson is to type the code out yourself—build up that muscle memory in your fingers!
Start the lesson by forking and cloning the working-with-jquery repository.
Fork & clone the “working-with-jquery” repo.
The repository will have some starter files to get you on your way and include requirements for Markbot so you can be sure you’ve completed the lesson.
This includes some starter code that you can get by forking and cloning the repository. You’ll use Markbot to double check everything is done properly.
Before we get started, create some files and get ready.
index.html & add the boilerplate code.main.css in your css folder & add the boilerplate code.dinos.js in your js folder & connect it to your HTML.main.js in your js folder & connect it to your HTML.Don’t forget to follow the naming conventions.
Create the boilerplate with html5, viewport, css & jss
Create the boilerplate with borderbox
Here’s the HTML we’ll need to complete this demo.
<!DOCTYPE html>
<html lang="en-ca">
<head>
  <meta charset="utf-8">
  <title>Working with jQuery</title>
  <meta name="viewport" content="width=device-width,initial-scale=1">
  <link href="css/main.css" rel="stylesheet">
</head>
<body>

  <h1></h1>
  <ul></ul>

  <h2 class="more-dinos">Prehistoric air creatures</h2>

  <script src="js/dinos.js"></script>
  <script src="js/main.js"></script>
</body>
</html>
We’re going to manipulate these HTML tags in our JavaScript.
There are many different ways to include jQuery in our project. The fastest is to use a content delivery network (CDN) and link to their copy of jQuery, like we do with Google Fonts.
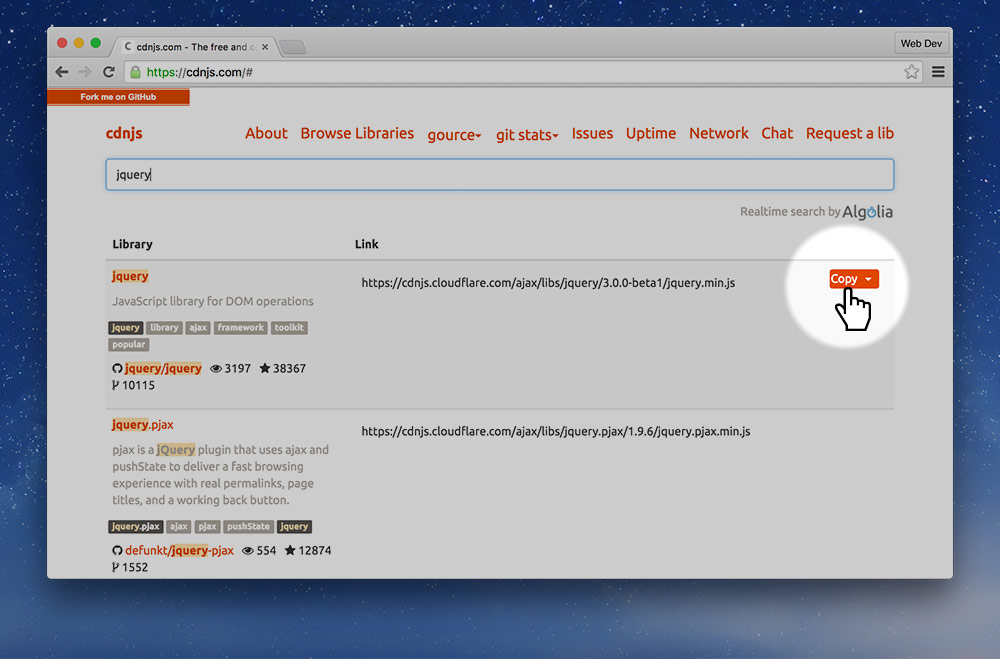
copy button beside the URL.<script> tag in our HTML.src="" attribute.⋮
<h2 class="more-dinos">Prehistoric air creatures</h2>
<script src="https://cdnjs.cloudflare.com/ajax/libs/jquery/3.2.1/jquery.min.js"></script>
<script src="js/dinos.js"></script>
<script src="js/main.js"></script>
</body>
</html>
The order of the <script> tags is extremely important—put jQuery first.
Paste the URL from cdnjs into the src="" attribute of the <script> tag.
Before we start manipulating our HTML, let’s make a list of dinosaurs we can use.
var dinos = [
  {
    name: 'Diplodocus',
    img: 'diplodocus.jpg'
  },
  {
    name: 'Hadrosaur',
    img: 'hadrosaur.jpg'
  },
  {
    name: 'Iguanodon',
    img: 'iguanodon.jpg'
  }
];
We don’t need jQuery to manipulate our HTML with JavaScript—jQuery just provides a simplified interface for common tasks.
var $h1 = $('h1');
var $ul = $('ul');

$h1.html('Dinosaurs!');
$ul.addClass('dino-list');

$('.more-dinos').remove();
This is what we should see now that we’ve manipulated the HTML a little bit

Notice how the <h2> tag has been deleted and the <h1> tag now has text inside it.
JavaScript uses CSS selectors to choose things in the page.
In between the () is the CSS selector: we can use tags, classes, IDs, :first-child, whatever.
We’re storing references to the HTML tags for later use in two variables.
The $ at the front of the variable isn’t necessary—it’s just common practice to put a dollar sign at the start of variables that represent jQuery objects.
jQuery’s html() function allows us to change the HTML code inside an element.
With jQuery we can add and remove classes using these two functions:
addClass()removeClass()There’s also hasClass() that we can use in if statements to see if the class exists on an element.
We don’t need to always store a reference to the HTML element in a variable if we are only going to use it once.
jQuery’s remove() function will delete an element from the document.
Using a combination of the Javasript we already know and jQuery functions we’re going to loop over all the dinosaurs and generate HTML for them.
⋮
$ul.addClass('dino-list');

$('.more-dinos').remove();

dinos.forEach(function (dino) {
  var $li = $('<li>');
  var $figure = $('<figure>');
  var $img = $('<img>');
  var $caption = $('<figcaption>');

  $caption.html(dino.name);
  $img.attr('src', 'images/' + dino.img);

  $figure.append($img, $caption);
  $li.append($figure);
  $ul.append($li);
});
We’ll use a forEach loop to iterate over the dinosaur array.
These variables look very similar to previous jQuery selections. But because they have angle brackets <> that means we’re creating a new element.
jQuery has a function called attr() that allows us to manipulate attributes on HTML elements.
attr(attribute-name, attribute-value)
If you don’t put the second argument, the value, then jQuery will get the attribute value and return it.
jQuery has an append() function that will add HTML into other HTML elements.
We can pass it as many new elements that we want and it will add them to the end inside the HTML element.
There are a few more manipulations like this:
prepend() — add to the beginning, inside the HTML element.after() — add to the HTML below this elements closing tag.before() —Up until this line the dinosaur won’t even be visible on the screen. We created new HTML elements, but they only existed in the JavaScript. This line will add them to the HTML tag that’s already in our index.html file.
Let’s add a little CSS to our application to style things a little more nicely.
⋮
*, *::before, *::after {
  box-sizing: inherit;
}

.dino-list {
  margin: 0;
  padding: 0;
  list-style-type: none;
}

.dino-list li {
  margin-bottom: 1.5rem;
}

.dino-list figure {
  margin: 0;
}

.dino-list img {
  display: block;
  width: 200px;
}
The .dino-list class doesn’t exist anywhere in our HTML, we added it to the <ul> using JavaScript, with this line: $ul.addClass('dino-list');
Drop the final, coded exercise into Markbot and fix all the errors until Markbot gives you all green (and maybe a little yellow).
After you’ve fixed all the problems, go ahead and submit the assignment. You’ll immediately get your grade.